Events in tag manager are user interactions or occurrences on your website or app that you can track and send data to Google advertising and measurement products. For example, you can track events such as page views, clicks, form submissions, purchases, etc. You can use different types of tags and triggers to configure and fire events in the tag manager. Some events are automatically collected, while others require manual setup. Events can have parameters that provide additional information about the event. Events can help you measure and optimize your conversion rate and user behavior.
There are many ways that we can track events or user interaction on our website and send it to Google Analytics
1. Automatically tracked events
2. Enhanced measurement
3. Recommended events
4. Custom events
5. Create new events (through GA4 )
Automatically tracked events
In GA4, some of the events are automatically created by Google Analytics 4 which automatically tracks the event on your website such as
1. First_session (when a new user visits your website)
2. Session_start (when a new session starts and the duration of a session is 30 minutes with no interaction)
3. user_engagement (when a user spends more than 10sec in your website and goes to a different page)
Enhanced measurement
You can turn on the enhanced measurement by going to Google Analytics 4
- And going to the Admin
- And Data Streams
- You have to click on your website
And you can turn on the Enhance measurement or configure the measurement that you want to turn on

Recommended Events
You must create a new event from [[1. Google Tag manager]] if you want to track certain events such as purchases and newsletter signups which are not automatically tracked in Google Analytics 4.
As there are many websites with different specific work, we can send different events data to Google Analytics to process
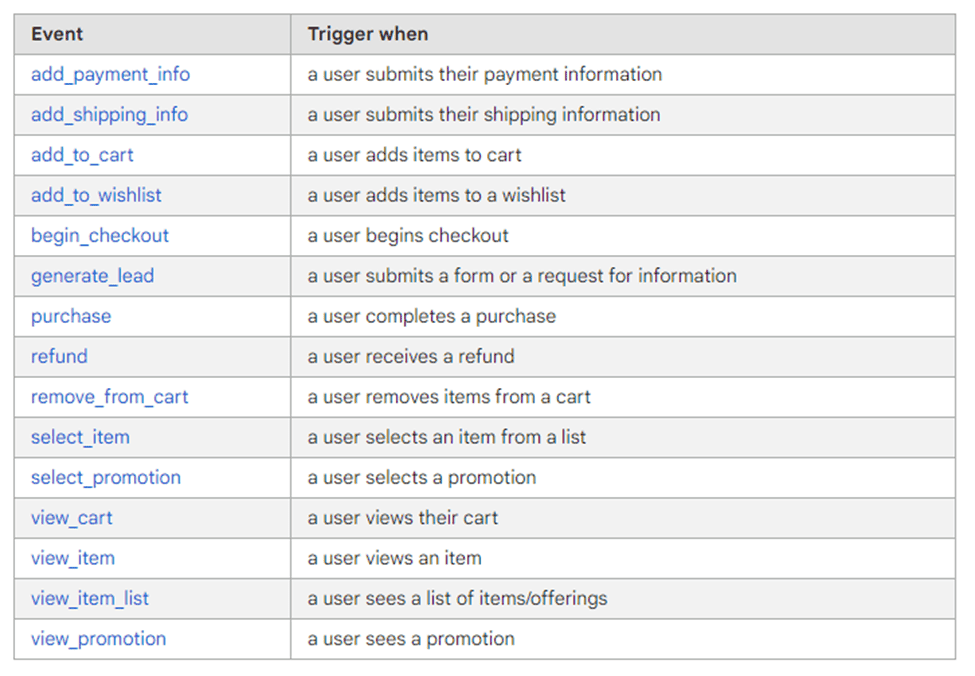
To find the recommended events’ name and data structure you can check the Recommended GA4 Events
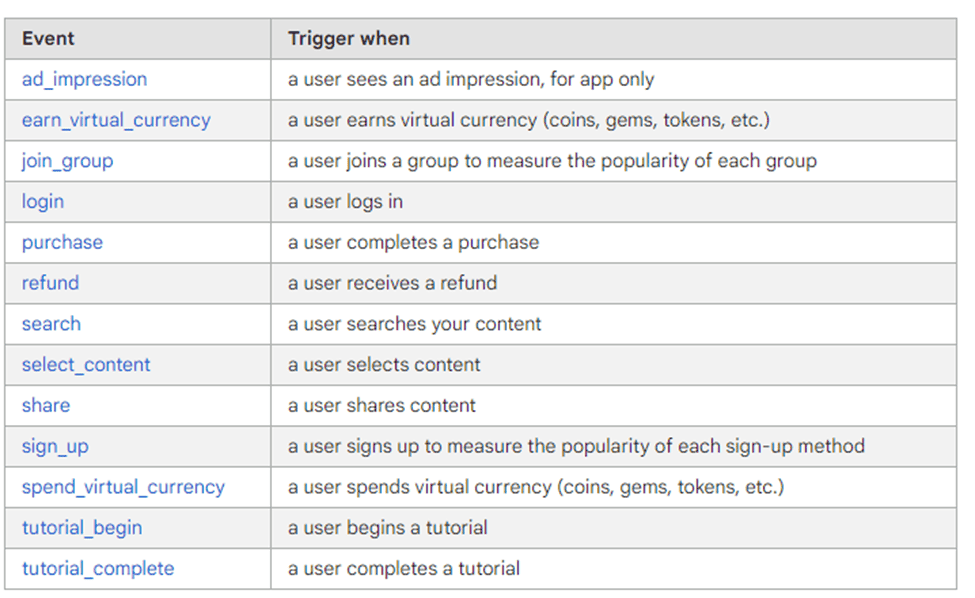
For E-commerce
Example of how to create a recommended event in Google Tag Manager
Creating Triggers
In the tag manager, first, we need to create a trigger
1. We can do it by going to GTM and clicking on Triggers on the left
- Click on the new trigger
- We need to give the trigger a name
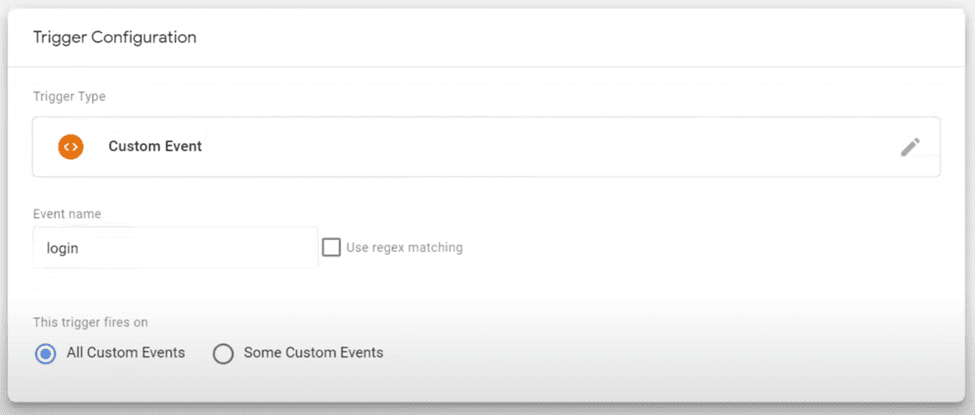
- Choose the trigger type Custom Event
- Create the event name the same as the event data you have in your data layer
- In our case, the name of our event is login
- save the trigger
Creating Tags
now you need to create Tags for the event
- you can click on tags on the left above Triggers
- and click on New
- Click on Tag Configuration and select Google Analytics: GA4 Event
- Now you need to choose your configuration GA property
- You need to give the name of the event log in
- (You must write the event name that is related to what you are tracking or you can check the GA4 website for recommended event names)
- Now you need to choose the trigger that we created
- Click on save
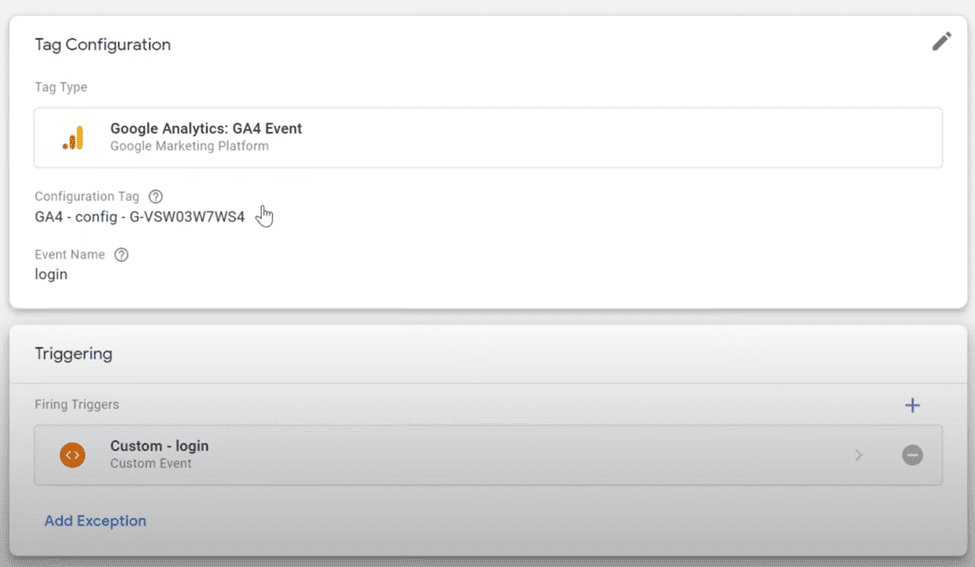
So when a log-in event fires in your website from a user, this tag will fire and the data will send to GA4 that a login has been triggered
You can see the event firing in the GA4 debug mode
You can see the debug mode
In GA4, Admin
Clicking on Debug mode
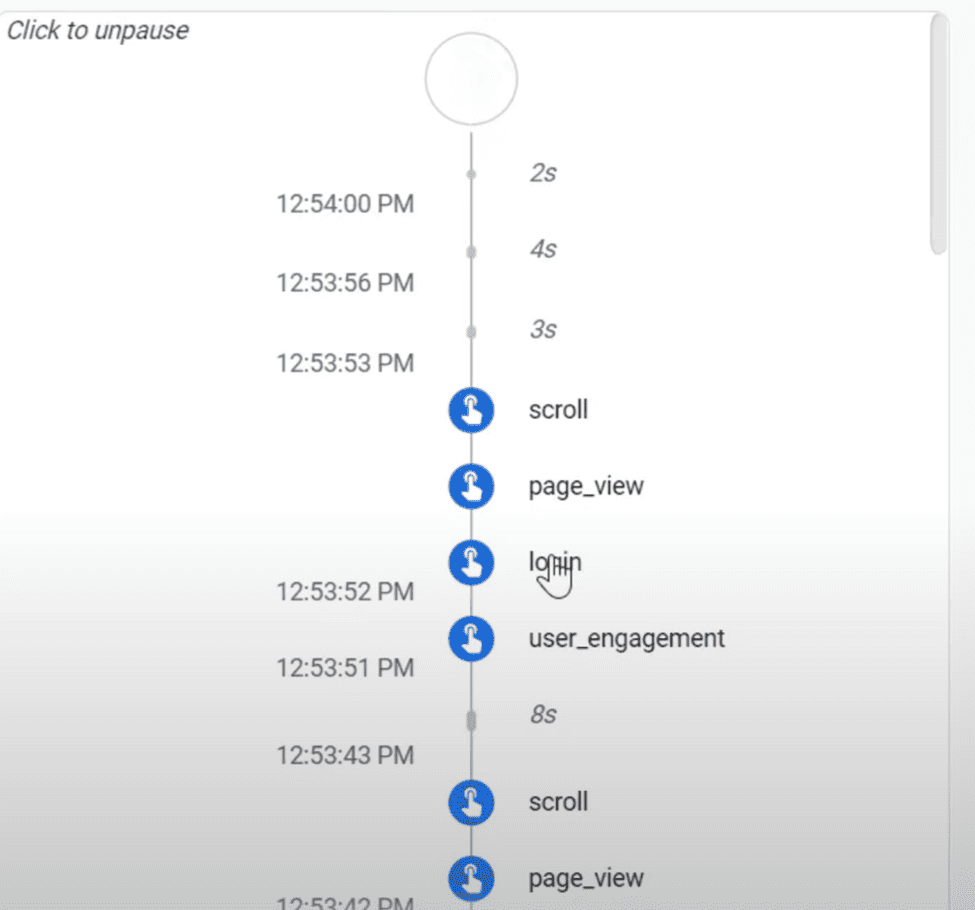
You can also add different parameters in the event to send to GA4
To create a New Event Parameter, you need to
Go to the same Tag and click on Event Parameter
Click on Row
and we can add the Parameter name and the value

We can check the parameter name in the Recommended Event Site, by clicking on the respected event name.
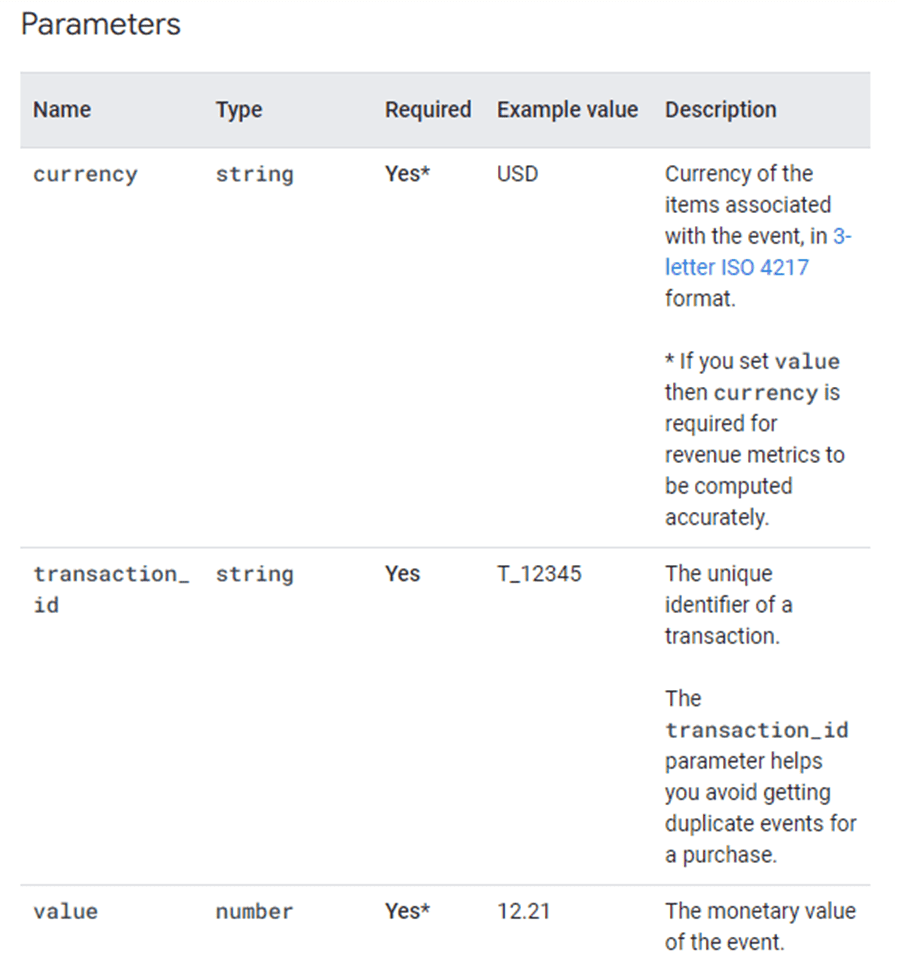
If you have a new parameter, you cannot see it in the reports because you have not created a new dimension called a method
You can create a new custom definition by – clicking on the link
You need to publish the event in Google Tag Manager to start tracking the users in your website
Custom Events
If you cannot see the event that you want to see in the Recommended Event Site then you can come up with your own custom events parameters
Example of a Custom event
If you want to track certain links or elements in our website such as
We want to track the menu clicks or menu items on our website
To track the data that we wanted, first, we need to look at our variable in the data layer
In the given example, we are looking at the page URL that that takes the user to a different page.
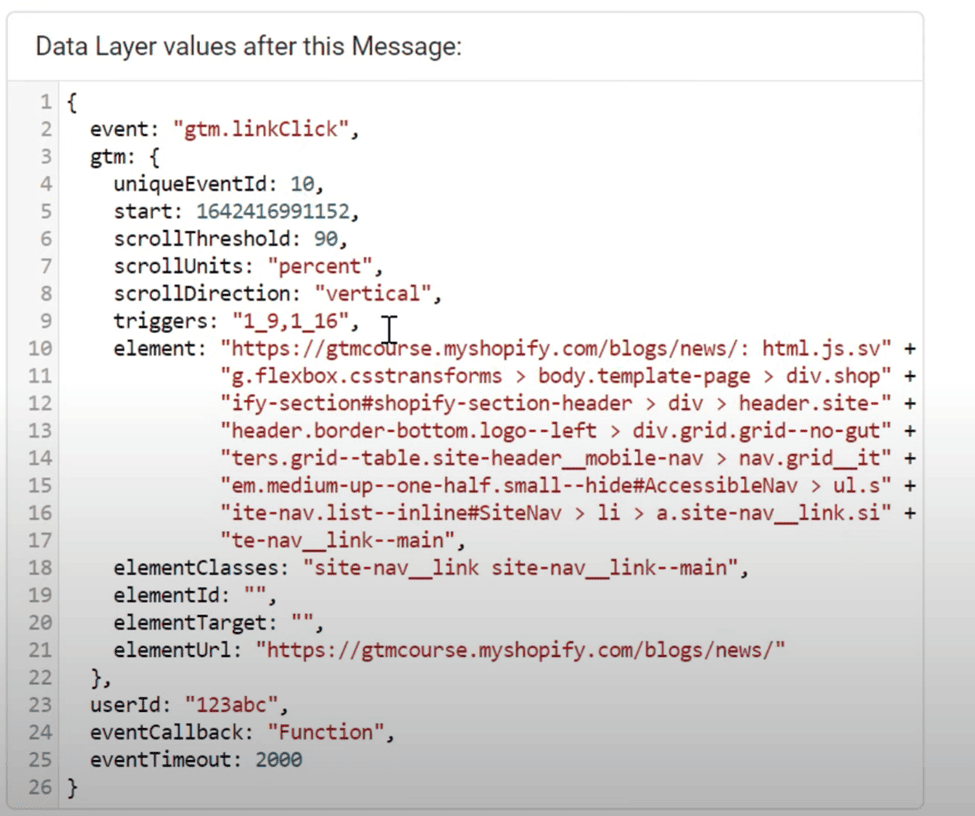
In the above data-layer scenario we are looking at the elementUrl variable which changes according to the links clicked.
Variables
We can enable build-in variable in Google Tag Manager which allows the use of data from the data layer. We can enable the build-in variable from the Variable tag on the left side and click on the Configure button.
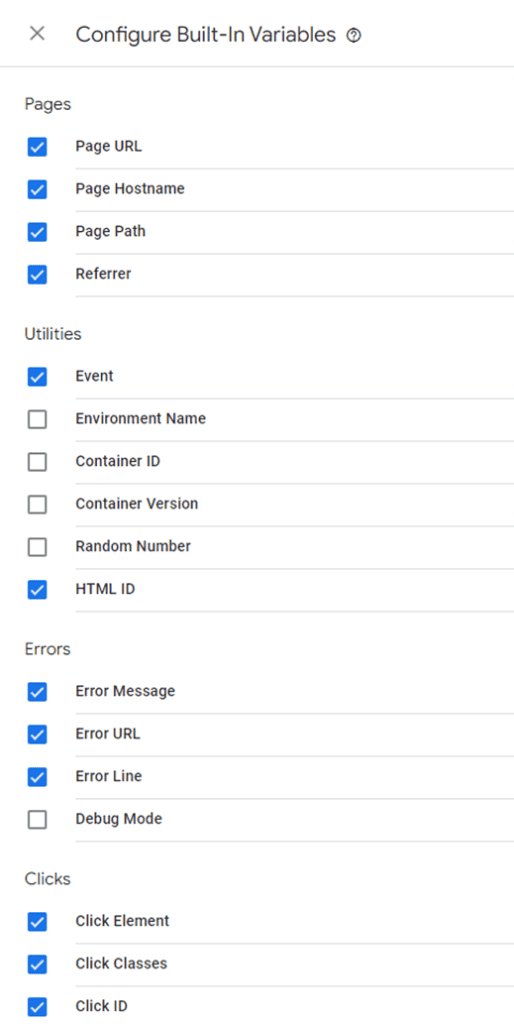
You can toggle the built-in variable by clicking on the variable name. By toggling on the variable, it can be visible on your data-layer of the preview page of the tag manager.
How to Capture all the links Click on your website
To capture all the links clicked on your website you can insert a trigger that can detect all link clicks which can be done by
Clicking New Trigger
Selecting Click-Just Links trigger
And selecting
This trigger fires on All link Clicks

this will capture all the links that have been clicked on your website and show that clicked linked data variable in the data-layer
now you can select the variable in the data-layer to create a trigger
in our case, we can use the Click-Class variable
Creating trigger
Go to Trigger
Create a Trigger and choose the trigger type Click-just links
Now use Some Link Clicks
And select Click Classes – Contains – site -nav_links (this is taken from the data layer)
Save
Creating Tag
Now we need to add this trigger to the tag
Select Tag from the left column and select Create
Choose Tag type Google Analytics GA4 Event
And configuration Tag as GA Code
And even name menu_link_click (check if the event name is available in the recommended event)
Now add the Event parameters
menu_item_name {{click text}} (from the data layer variable)
as the above event parameter is a custom parameter we need to register as a custom dimension in GA4
Now add the Trigger that we made before
Save
How to modify events
Example scenario:
One of the event names that is sent to the GA4 is a mistake or all capital letters which GA4 will not take because the GA4 is case-sensitive
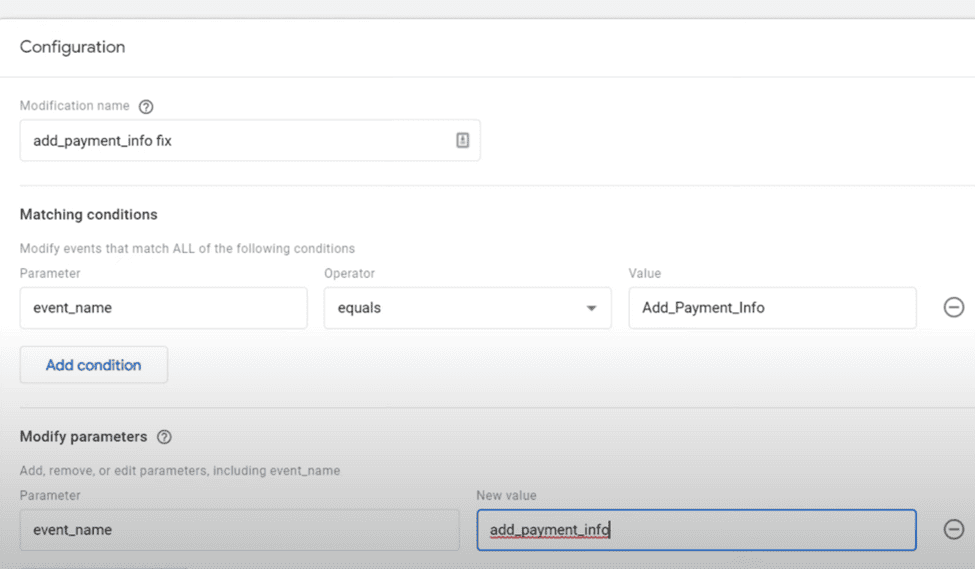
Value: Add_Payment_info needs to be: add_payment_info
So in that case
We can use the modify event option
We need to go to the Admin
Then Events and then modify events
First, we need to match the condition
event_name equals Add_Payment_Info
And modify the parameter
event_name add_payment_info
And then Create
Now you can test your tag by going to the Preview mode or going to Debug mode on your GA4
Do not forget to Publish your workspace and save all your tags and trigger

